JavaScript is either disabled or not supported by your browser. JavaScript must be enabled in order to use 1800drywall.ca website. Please, enable JavaScript by changing your browser options and try again.

Close

CRITICAL ANNOUNCEMENT (West Canada Only)

 Tariff Charge – Drywall Cost Increase Notice Effective September 14, 2016

All tariff charges levied by the Canadian Border Services Agency will be flowed through to Western Canada Consumers. The tariff varies by product and province and will be added to quotes and orders.  Online quotes and orders will be subject to review and ensure the tariff charge has been included.
===========================


CONTRACTORS PLEASE NOTE!

Online Pricing Does Not
Reflect Contractor Pricing

Call us at 844.379.9251 or Live Chat
to Obtain Your Quote
We Provide:
  • Boom & Carry in Service
  • Next Day Delivery
  • A New Fleet of Equipment plus Experienced Delivery Personnel
  • Drywall, Insulation, Steel, Finishing Products, etc.
  • Contractor Loyalty Program


?????????
?????????
?????????
?????????
?????????
?????????
?????????
?????????
?????????
?????????
?????????
?????????
?????????
?????????
?????????
?????????


1-844-379-9251

 
TO SEE OUR PRICES AND PLACE AN ORDER PLEASE
 

How to Install Batt Insulation

Before any insulation project, make sure you caulk and/or seal any openings.
Due to the nature of insulation products, it is recommended that you wear protective eye glasses, a dust mask and gloves.
  1. Open the insulation bags by cutting lengthwise through the side panel. Be careful to avoid cutting the product. The insulation will quickly expand to its full volume when the bag is opened.

  2. Gently push batts into the cavity so that it sits all the way in, especially at the corner and edges.

  3. Fluff it to its full expansion by pulling it forward to fill the depth of the cavity. The fit should be snug. Allow friction to hold the batts in place.
    For shorter spaces, cut the insulation to fit properly. Don't double it over or compress it. Compression changes the R-value of the insulation.
    Cut insulation about an inch wider than the space using a sharp utility knife against a safe backstop such as an unfinished floor or other smooth, flat surface. Use a straight edge to hold the insulation in place and guide your cut (a metal ruler or T-square for example). Always cut on the unfaced side of the batt. Cut insulation to fit snugly around obstructions such as electrical boxes and plumbing.
    If it takes more than one batt to fill the height of a wall cavity, make sure the two pieces are butted snugly together.

    Use scraps to fill around windows and other openings.

    Once all of the insulation is in place, you will need to cover it with a vapor barrier, or poly.

To prepare for application:
  1. Fill in any narrow gaps between joists by forcing pieces of unfaced insulation into the gaps with a screwdriver or putty knife.

  2. To control air leakage, apply caulk or foam sealants around openings like window and door frames and any openings where wires or pipes go through the exterior wall.

To apply a vapor retarder:
  1. To apply the poly film, start at the top plate in one corner of the room.

  2. Pull the film tight and staple at least every 12 inches.

  3. Drive staples at the center of every stud and around openings, working around the room.

  4. Overlap the sheets by one complete cavity to minimize leakage. Then staple evenly through, fastening both sheets to the studs at one- to two-foot intervals.

  5. Pull the film tight along the sole plate and staple in the same manner, making sure the staples are driven flat, flush to the stud surface.

  6. Trim out the poly from over windows, doors and electrical boxes.

Note: In areas of the country where vapor retarders are not required, bathrooms would require unfaced insulation and no poly film covering to allow moisture to escape.
Check out this link to Owens Corning website for detialed How To Videos: http://insulation.owenscorning.com/homeowners/tools-resources/videos.aspx
ESTIMATING YOUR DRYWALL AND FINISHING NEEDS:

1-800 Drywall, online drywall and insulation supplier, will calculate the amount of drywall sheets, joint compound, screws, and joint tape required for a remodeling or building project. Enter the dimensions of your walls and ceiling and with our drywall insulation estimator we will do the rest.

How to Install and Finish Drywall like a Professional

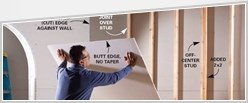
For a professional looking finished product, please reference the following tips to properly plan the job, including materials needed, application methods and tools needed for the job. It is recommended you plan out the job on paper (i.e. size and positioning of drywall panels) and have all of the tools you need handy before beginning. Also, measure twice and cut once. Improper measuring results in improper fit, wasting your time and money.

Servicing
Ontario: Toronto | Ottawa | Hamilton | Barrie | Burlington | Guelph | Kingston | Mississauga
Manitoba: Winnipeg
Saskatchewan: Regina
Alberta: Edmonton | Calgary | St Albert | Red Deer
British Columbia: Vancouver
Quebec: Gatineau
...plus many more communities.


Canada’s Trusted Online Drywall, Insulation and Roofing Supplier!