For a professional looking finished product, please reference the following tips to properly plan the job, including materials needed, application methods and tools needed for the job. It is recommended you plan out the job on paper (i.e. size and positioning of drywall panels) and have all of the tools you need handy before beginning. Also, measure twice and cut once. Improper measuring results in improper fit, wasting your time and money.
For walls 8’2” or less from floor to ceiling it is recommended you use a horizontal application to reduce waste and lineal footage of joints to be finished.
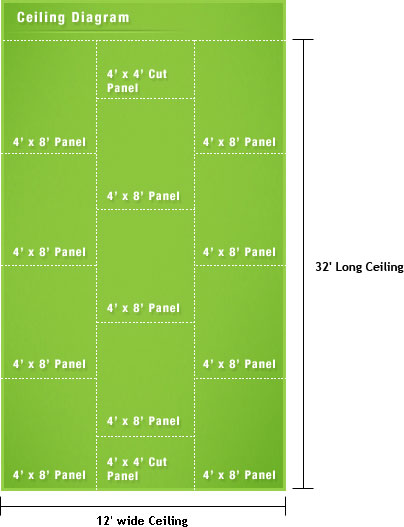
For walls greater than 8’2” in height you should use a vertical application for ease of install. If possible span the entire wall or ceiling from corner to corner. Use the longest length of panels available for your project location, and when end joints occur, they should be offset in adjacent rows as shown in the diagrams below:
Materials & Tools Needed
Here is a list of what you need for a successful drywall project.
- Drywall
- Drywall Mud
- Paper Tape
- 6” Taping Knife
- 10” Taping Knife
- Corner Beads
- 1 ¼” Drywall nails,
- 1 ¼” drywall screws
- Mud Pan
- “T” Square
- Utility Knife
- Knife Blades
- Saw Horse
- Screw Gun
|
- Screw Gun Bits
- Tape Measure
- Carpenters Pencil
- Drywall Hatchet
- Tin Snips (to cut paper bead)
- Sand Paper
- Drywall Saw
- Pole Sander
- Safety Glasses
- Drywall lifter
- Portable work light
- Extension Cords
- Drop clothes
|
For help calculating the amount of materials you need for your project, click here
Ceiling Diagram
Wall Diagram
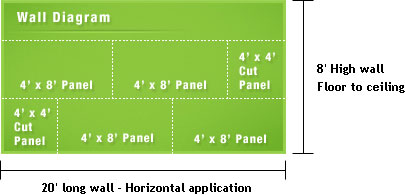
Note: In the above diagrams the sides (bevelled edges) of the drywall all line up, while the ends (butt edges) are all off set. This will lead to the best finished results.
Marking and Cutting the Drywall
a. Marking – With drywall face side up (light coloured) measure and mark the panel size needed.
b. Cutting – Line up marks with a “T” Square, while holding square firmly use a utility knife to score through the paper and part way through the panel core along the edge of the “T” square (this will require a sharp knife blade, be sure you have extras). Then grasp panel on both sides of cut line and snap board with a quick movement away from the scored face paper. Complete cutting by running the knife through the back of the paper.
c. Cleaning Edges – Smooth all cut edges with a utility knife or a rasp. Keep panel edges as square as possible.
d. Cutouts – For openings such as electrical outlets, measure across from the point where the edge of the panel will rest to the near and far sides of the electrical box. Then measure from the point where the top or the bottom edges of the panel will fall to the top and bottom edge of the box. Now trace an outline of the electrical box at the appropriate position on the sheet of drywall. Cut out traced area using a keyhole saw.
Installing the Drywall
a. Ensure wall and ceiling framing is square and straight. Repair or replace framing members if needed.
b. To attach the drywall, hold the panel tight against the framing members and using a screw gun and 1 ¼” drywall screws secure the panel in place (screws provide much better holding power then nails and greatly minimize fastener popping and added finishing costs). Space the screws approximately 12” apart for ceilings and 16” apart for walls. Start by installing screws in the center of the panel and working toward the perimeter. Be sure to install screws at least 3/8” from edges and ends of drywall. Be sure to set your screw gun so that heads of the screws slightly counter sink into drywall without breaking the face paper.
Ceilings
a. Apply ceilings first, with two people handling the drywall if possible. (If doing the job alone, a panel lifter will come in handy. These are available to rent from 1-800Drywall.) Assure firm contact is made with the drywall and ceiling joists. Fasten panels to all joists using the fastening method above, starting at the centre of the panel and working toward the perimeter.
b. Make sure the ends of all panels can be attached to a framing member and offset from the panel beside, even if this means cutting a panel. This will reduce the possibility of joints showing at the finished stage.
Walls
a. Horizontal Application. For horizontal application, first apply the top panel tight against the ceiling panels. Be sure to stagger end joints in adjacent rows (see above diagrams) even if it means cutting panels. This will reduce the possibility of joints showing at the finished stage. Install the bottom sheet by ensuring it is tight against the sheet above (this is easily done with a drywall lifter) and fasten as outlined above. Leave a minimum ¼” gap between the gypsum board and the floor. Try and avoid vertical joints directly above or below windows, doors, or other openings for best decorating results.
b. Inside Corners. To join panels at an inside corner, simply but the second panel against the first and fasten to a stud.
c. Outside Corners. When coming to an outside corner overlap the second sheet so it is flush with the end of the first and fasten by sheets to the common stud.
d. Vertical Application. Use vertical application when your ceiling height is over 8’2”, as this will result in fewer joints and less waste. Follow all fastening methods as described above.
Corner Bead and Trims
a. Outside Corners and Inside Offset Corners- Apply paper bead to all exterior corners of walls, soffits, window returns, inside corners that are not 90 degrees, and where drywall panels butt against windows or concrete block. Measure the length of the corner and cut bead to the desired length.
For vertical wall installation, cut the bead ½” shorter than the wall height. Using a 4” taping knife, apply joint compound to drywall slightly beyond where the edge of the trim will be (approximately 2” from the corner on each side).
Helpful Hint: For this step, application of the compound often works best if the compound is thinned slightly with water. Add water in small increments (for one gallon, add 2 oz. increments - or ½ gallon of water for a 5 gallon pail is enough) and mix with compound. It should slide easily over the wallboard as you drag the knife. If it takes a lot of effort and you find you have to force it onto the wall, thin it down a little more, but be careful not to over-thin.
Place trim on wall, aligned tight to the ceiling, and press into position. Embed the trim by running the knife over it with even pressure at a 45 degree angle. Use the knife or a damp sponge to remove excess compound, eliminating any air bubbles under the paper. Allow to dry.
Joint Finishing
a. First Coat – Flat Joints. Start with the butt joints. Apply an even thin coat of drywall compound for the length of the joint with a 5” finishing knife. Centre and lightly press joint tape into the wet drywall compound with fingers. Starting near the centre of the joint, draw the 5” knife firmly along the joint to tightly embed the tape in the compound. Do this in both directions, removing excess compound by holding the knife at a 45 degree angle to the panel and drawing it along the joint. Leave sufficient compound under the tape for a strong bond but no more than 1mm under the edge.
Now apply a thin coat of compound over the complete length of the joint tape to reduce edge wrinkling or curling so the tape is easier to conceal with following coats. Again, application of the compound often works best if the compound is thinned – see directions above in outside corners section.
Keep the knife blade clean at all times, especially of dried bits of compound, to avoid leaving scratches in the wet joint compound as you draw the knife over it. Discard any compound containing dried bits of material. Clean the blade by drawing it over the edge of the pan.
b. First Coat - Tapered Joints. To reinforce tapered joints, follow the same procedure. Tape should overlap the tape applied to butt joints.
c. First coat – 90 Degree Inside Corners. With inside corners you will need to imbed a piece of joint tape. Apply a thin layer of compound on both sides of the inside corner using a 5” knife. Be sure the compound extends slightly wider than the area to be covered by the tape. Fold the joint tape along the centre crease to form a right angle and lightly press it into the inside corner top to bottom. Using your 5” knife, firmly press it into the board from the centre towards the top and bottom. Now embed the tape as described in above section on Flat Joints.
d. First Coat – Fasteners. Draw a clean joint-finishing knife over nails or screws. If a metallic ring occurs, drive in the nail or screw to the correct depth being careful not to break the paper before surface finishing. For each fastener depression, apply compound with a 5” knife. Hold the blade almost flush with panel and draw joint compound across the fastener head. Then raise the knife blade to a more upright position and scrape off any excess compound with a second stroke at a right angle to the first stroke. The compound should be level with the panel surface.
e. Second Coat – Flat Joints and Fasteners. After the taping coat has dried (at least 24 hours), scrape off bumps, ridges and other imperfections with a clean finishing knife. Be careful not to damage the surface.
Apply compound to the length of the tapered joints using an 8” knife. Apply pressure to the knife edge farthest from the joint and lift the other edge just slightly above the surface. Draw the knife down joint. Repeat for opposite edge. This technique is called feathering.
Joint compound should extend beyond the first coat for a total width of 7” or 8”. Allow to dry. For butt joints, apply a 7” to 8” coat of compound to each side of the butt joints and feather. The joint will have a total width of about 14”. Allow to dry. For fasteners, apply a second coat in the same manner as the first coat.
f. Second Coat – Outside Corners and Inside Offset Corners. Once the first coat is dry, using a 6” taping knife apply another coat of joint compound, keeping this coat as smooth as possible. Feather the compound out 5” to 6” from the nose of the trim on each side. Let dry.
g. Second Coat – 90 Degree Inside Corners. Allow first coat to dry (at least 24 hours). Apply compound on one side using a 5” knife for the length of the corner. Feather the compound out onto the face of the panels approximately 2” beyond the first coat. Allow the first side to dry before applying compound to the second side, as trying to mud both sides will keep messing up either one side or the other.
h. Third Coat – Outside Corners and Inside Offset Corners. Once the second coat is dry, sand lightly if needed. Using an 8” or larger finishing knife, apply a finishing coat of the same compound. Feather the compound 8” from the nose of the trim. Let dry, then sand and prime.
i. Third Coat – Flat Joints and Fasteners. Allow second coat to dry. If necessary, remove imperfections with knife or sandpaper. Before applying the third coat, check to see if tapered joints are level with the surface. Hold a 10” blade across the joint straight out from the wall. If the blade can be rocked across the joint, the joint is humped. It must be hidden by feathering the final coat out as far as possible. Apply a thin finishing coat with a 10” knife for the flat joints and a 5” knife to the fastener heads. Press knife firmly so compound fills depressions but does not significantly add to thickness. Feather edges at least 2” beyond the second coat.
Sanding
To avoid the inhalation of sanding dust, always wear a NIOSH approved dust mask and ensure good ventilation. Eye protection is also recommended. NIOSH approved dust masks and eye protection are available through 1-800Drywall.
Use a fine grade, 80 or 100 grit open-coat sandpaper (120 grit for third coat) wrapped around a sanding block or pole sander. After drying, lightly sand imperfections in finished joints, corners and over fastening heads.
Avoid roughing the surface paper of the drywall panels when sanding. If you do rough it by accident, repair the damage by applying a little joint compound with a 5” knife. Carefully remove sanding dust with a damp sponge.
Painting and Decorating Preparations
All drywall surfaces, including drywall compounds must be thoroughly dry and not glossy. A good quality flax white latex paint undiluted should be applied uniformly and allowed to dry before painting, texturing, skim coating or applying paper, vinyl, or other wall covering materials.
If you’d like more information, check out CGC’s “How To Tips” at www.cgcinc.com/pdf/howtos/j371.pdf to see if they have what you need.
Or, check out Certainteed’s “How to Tips” at www.bpb-na.com/us/english/finishing_products/downloads/CTG-2333_2m_1-2007.pdf